GA4 Conversion Tracking on Go High Level
GA4 conversion tracking on Go High Level with GTM
In this guide, we’ll walk through how to track Google Analytics 4 (GA4) events on a Go High Level (GHL) website, using a real-world example of a business selling a digital product.
By the end of this guide, you’ll learn how to configure:
recommended GA4 events & basic e-commerce tracking
useful custom parameters
a simple, yet effective mechanism to prevent over-reporting
consent-based tracking & Google Consent Mode v2 setup using Cookifi
GA4 Conversion Tracking on Go High Level
Step 1: Prepare your GTM container
If you’d rather skip the guide and do it yourself, grab the ready-made GTM recipe here [coming soon].
Business context
Before we dive in, here’s a quick look at the business setup:
the business sells a one-off digital product
the customer journey looks like this:

Based on the customer journey, we'll track the following 2 events:
Request quote form submission: form_submit
Payment confirmation page visit: purchase
What you’ll need
This guide assumes that:
you already have your GTM container and GA4 property set up
you’re familiar with navigating GTM and GA4
(optional) you have a Cookifi property (or other CMP) set up, if you need consent-based tracking (required for EEA websites) and Google Consent Mode v2
If you’d rather have me take care of this for you, feel free to reach out here — happy to help.
If you're looking for data layers for Google Ads (with customisable product IDs, and dynamic remarketing), Meta Ads, and others - please reach out here, I've built solutions for those too.
Step 1: Prepare your GTM container
Constant variables
Let’s start by creating constant variables in GTM — these will save you time and reduce errors by storing values you’ll reuse across your setup.
A good rule of thumb: anything that doesn’t change (like IDs) should be stored as a constant variable.
GA4 Measurement ID
Navigate to your GA4 data stream and copy your measurement ID.
In GTM, create a Constant variable and paste your measurement ID:

I like to name this variable like so:
C - GA4 - Measurement ID - XXXX
(C stands for Constant, followed by tool name and last 4 digits for easy reference)
Google Tag
Next, we’ll create the main Google Tag (formerly known as the configuration tag).
This initialises the GA4 library and automatically tracks the basic page_view event.
In GTM:
Create a new tag: Google Analytics > Google Tag
Under Tag ID, insert the measurement ID variable you just created.
For the trigger, choose Initialization - All Pages. This ensures the Google Tag fires before any other GA4 event tag.
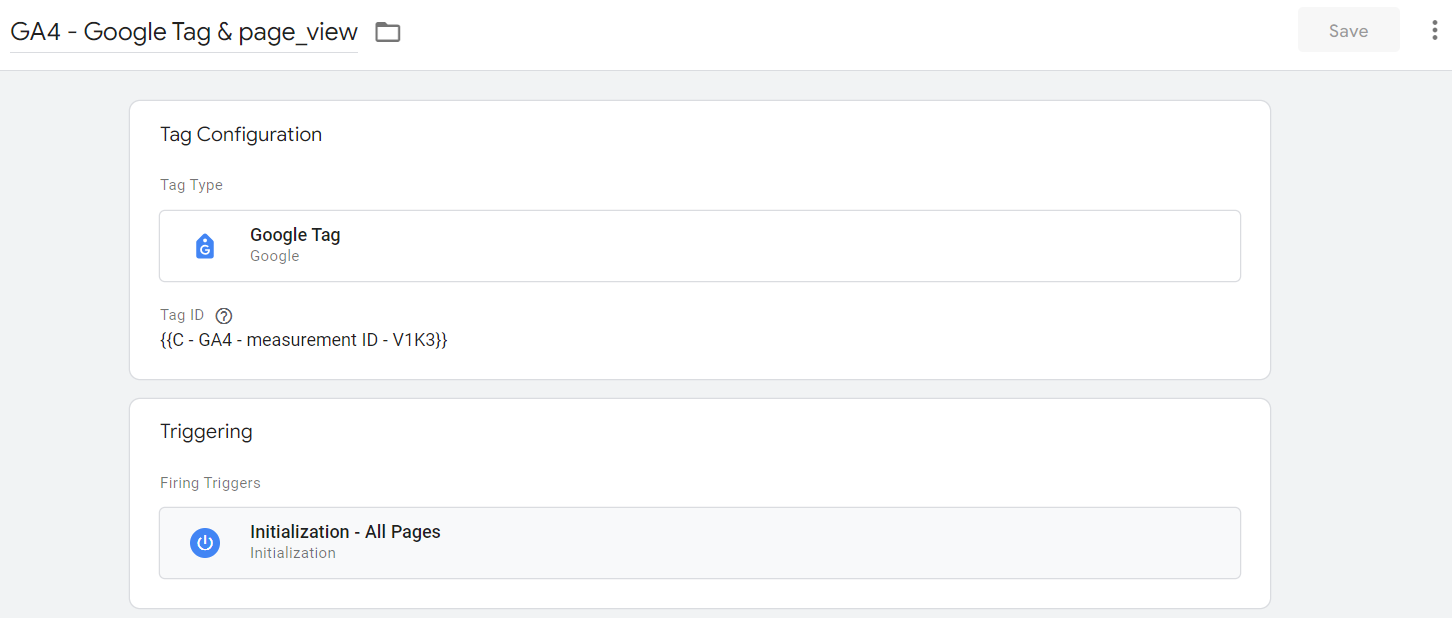
Name and save the tag.
Publish the container and test to confirm the tag is firing correctly and the page_view event gets sent to your GA4 property.
If Enhanced Measurement is enabled in GA4, you may also see additional events like scroll.
Step 2: form_submit event
When visitors land on your landing page, they’ll have the option to submit a Request a Quote form:
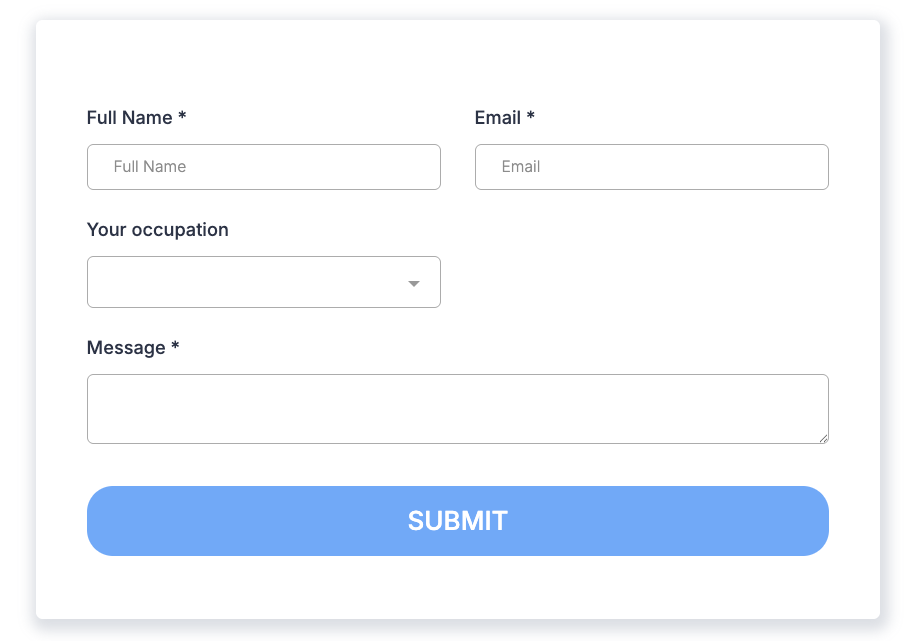
By default, submitting the form displays a confirmation message - without a page reload:

However, you’ll need to verify this behaviour in your specific GHL setup.
Trigger
Since there’s no page reload and the confirmation message appears dynamically, we’ll use the Element Visibility trigger in GTM.
Inspect the confirmation message element. You’ll notice a surrounding <div> with the class thank-you-message - GHL uses this class by default for confirmation messages:
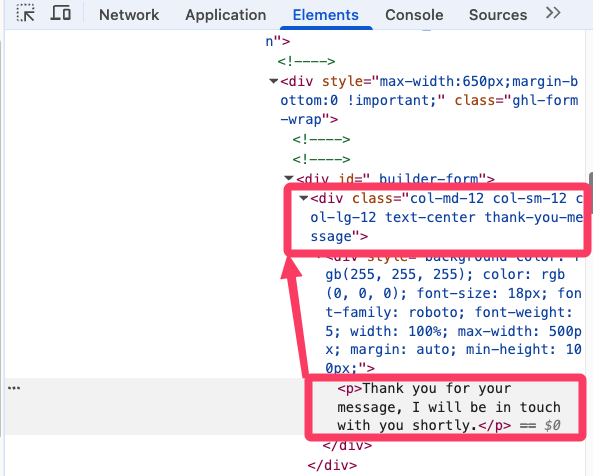
In GTM:
Go to Triggers > New > Element Visibility.
Set Selection Method to CSS Selector and enter .thank-you-message
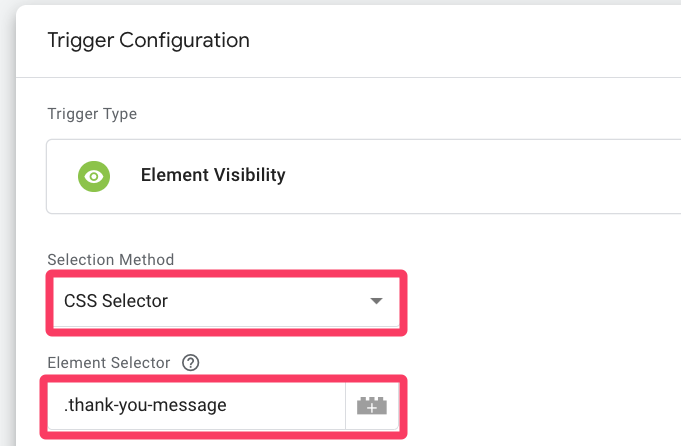
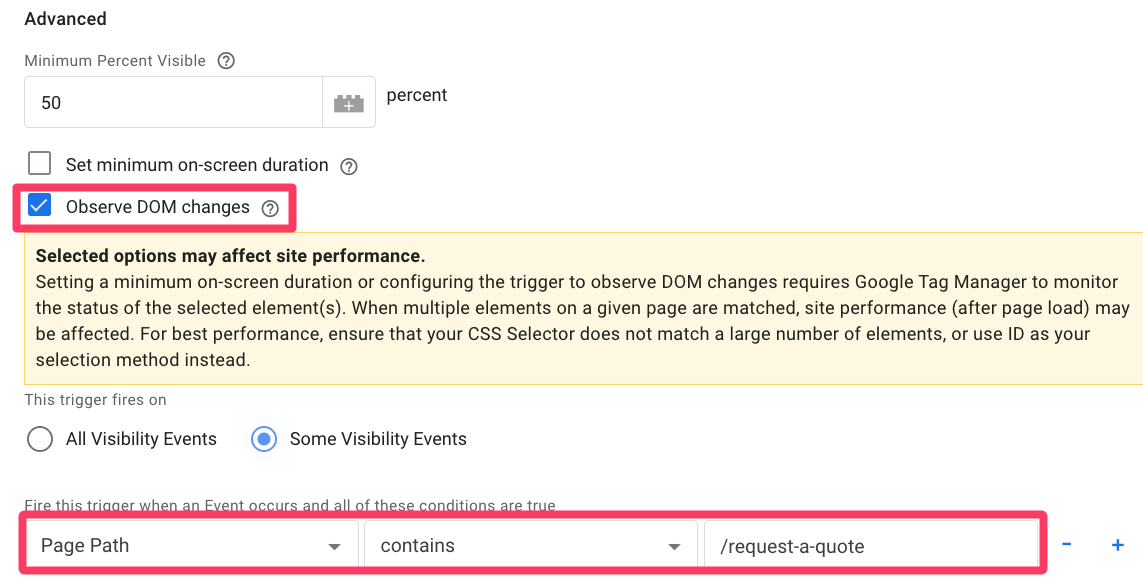
Under Advanced, enable Observe DOM Changes.
In Some Visibility Events, restrict it to fire only on the relevant page (e.g., Page Path contains /request-a-quote):
Name and save the trigger.
Tag
Next, create the GA4 event tag:
Tags > New > Google Analytics > Google Analytics: GA4 Event.
For Measurement ID, use your constant variable.
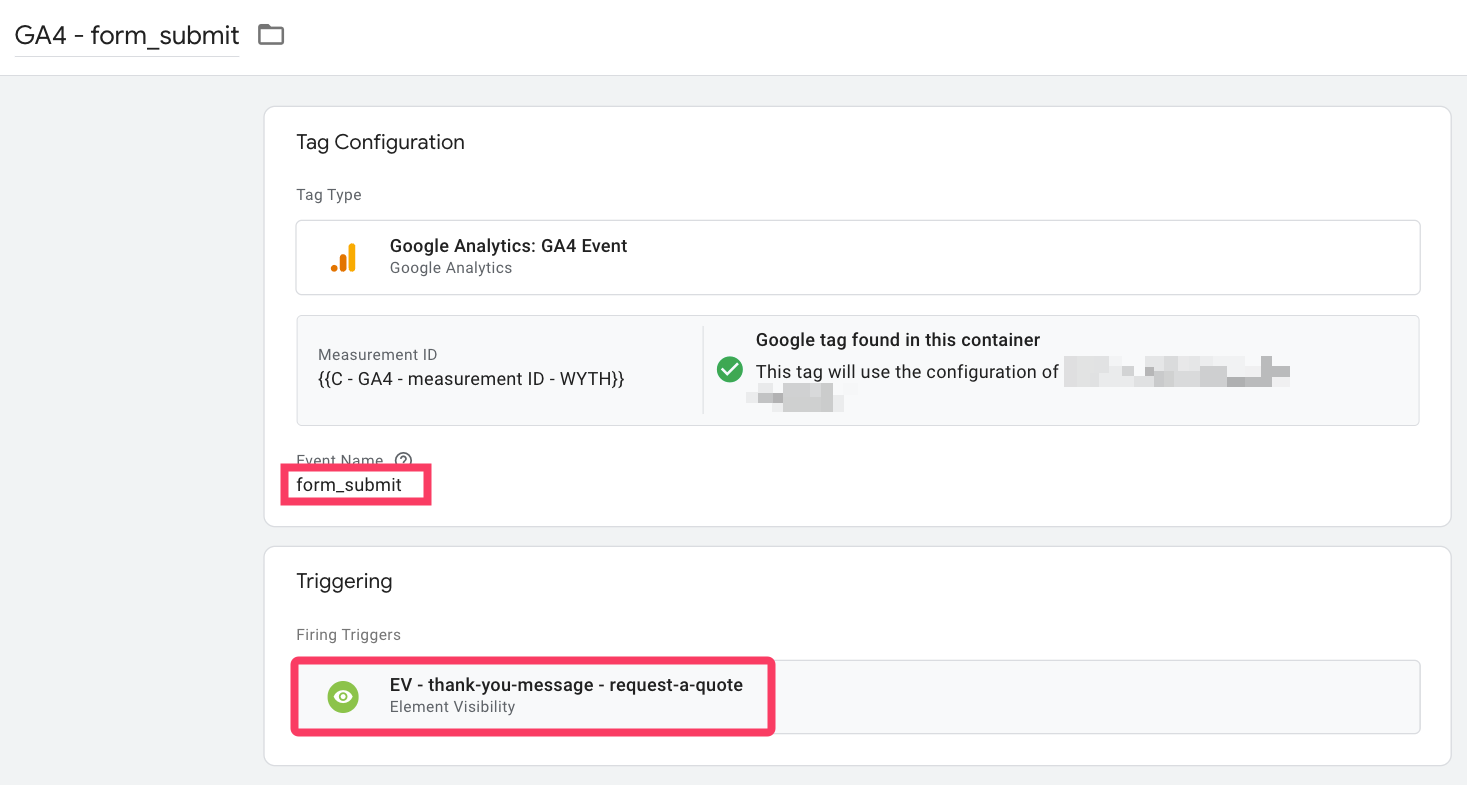
For the event name, use GA4's recommended event: form_submit.
You could also use any other custom event name that makes most sense for you, like request_quote_submit, or similar.
Assign the Element Visibility trigger you just created:
Name and save the tag.
Test submitting the form in Preview Mode to verify tracking works as expected.
Optional (but recommended):
To indicate this is an important event and to unlock some special pre-made reports in GA4, mark the event as a key event.
Navigate to your GA4 property's Admin > Property Settings > Data Display > Key Events > New Key Event and insert the name of the event exactly as is: form_submit.
Retrieve form data
As you may have noticed, the form contains an optional field - Your occupation:
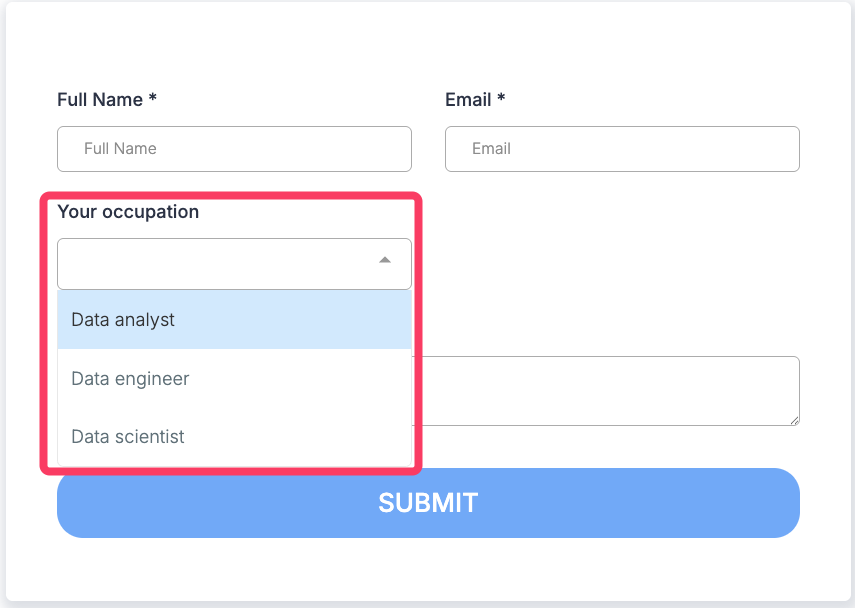
Collecting this data is extremely valuable - it allows you to analyse patterns, segment users, and improve audience targeting.
How to capture this data
Inspect one of the dropdown options:
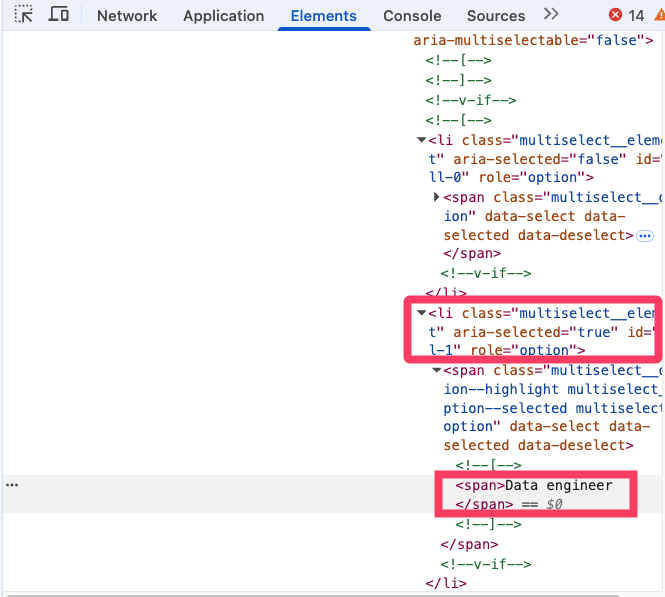
The text of the selected option is inside a <span> element that's inside a <li> element with the aria-selected attribute set to true - which means it's selected.
That's a good start, but to complete our CSS selector, we need to determine its closest unique parent that we could use for targeting.Scroll up the elements panel, and keep hovering over the different elements. Once the entire multi-select element is highlighted (on the left), note the class of the element (on the right):

Typically, GHL will use the multi-select-form class.
So, our selector will look like this:
.multi-select-form li[aria-selected="true"] span
To verify it's working as expected, select one of the dropdown options and run this code in the console:
document.querySelector('.multi_select_form li[aria-selected="true"] span').textContent
Push the data to the data layer
In GTM, create a Custom HTML tag with the following code:
<script>
(function() {
var selectedOption = document.querySelector('.multi_select_form li[aria-selected="true"] span');
var selectedValue = selectedOption ? selectedOption.textContent.trim() : undefined;
if (selectedValue) {
window.dataLayer = window.dataLayer || [];
window.dataLayer.push({
'multiselect_value': selectedValue
});
}
})();
</script>
This will push the value of the selected option to the data layer in the form of a message. If no option is selected, nothing gets pushed.
Please note the data layer can be used for this as there's no page reload. If there is a page reload upon form submission, you’ll need a different mechanism to store the data, such as local storage.
This tag should fire every time the submit button gets clicked. That way, we’ll ensure the most up to date selected value gets pushed to the data layer, just before the confirmation message appears.
To properly target the submit button, create a new Click > All Elements trigger first:
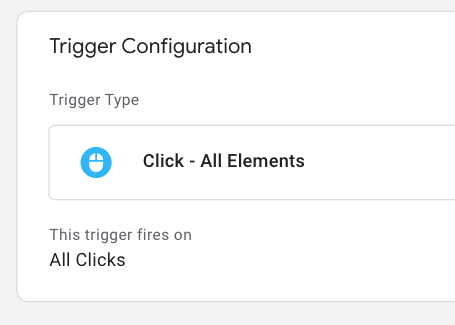
Go into the Preview Mode, click the Submit button and inspect the click data:
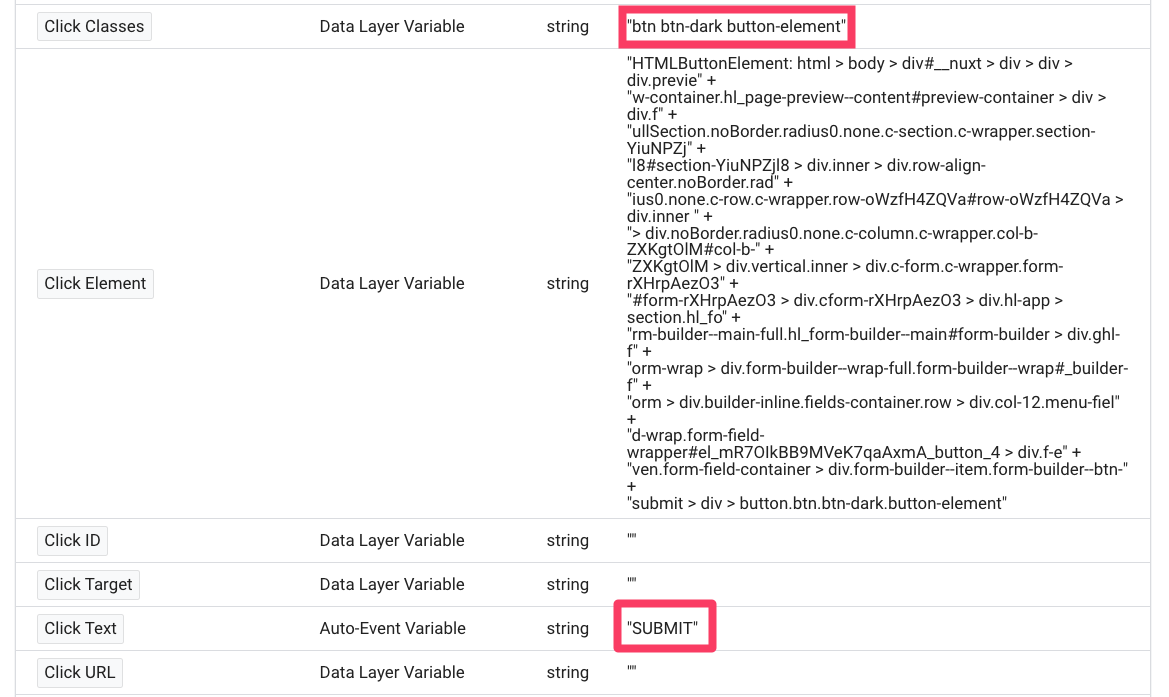
As you can see, it contains Click Classes and Click Text data that we could potentially use to narrow down our trigger. However, if you click on the submit button multiple times, you'll notice the click class data is inconsistent. That's why it's safer to use the Click Text variable.
Go back to your trigger, and modify it to only fire with the specified conditions:
Click Text matches RegEx (ignore case) submit
Page Path contains request-a-quote
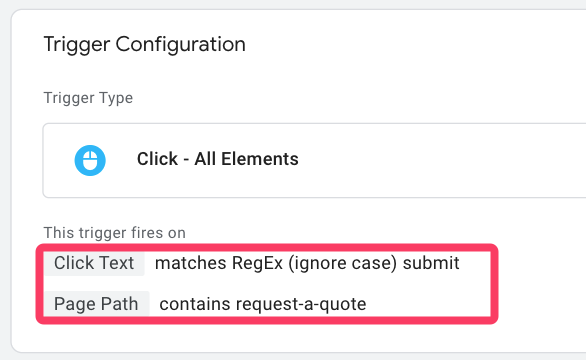
Finally, create a Data Layer variable to capture the value of the selected option:
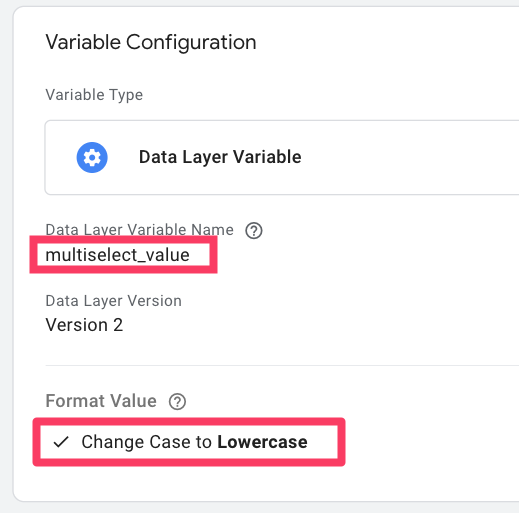
Make sure to insert multiselect_value into the variable name field, and change case to Lowercase to unify reporting.
Finally, add the variable as a user property in your form_submit GA4 tag.
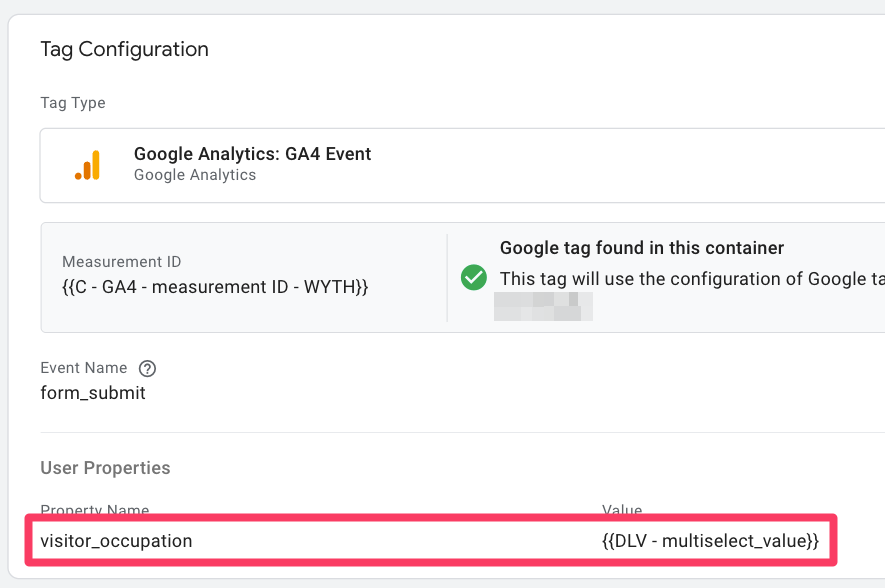
As you can see, I've added visitor_occupation (but this can be called anything that makes sense for you) user property with the newly created Data Layer variable.
We could add the newly created variable as an event parameter, but user property is even better for this use case, as occupation is something that doesn't change frequently.
Thanks to user property, this user and all its associated actions (even across different sessions) will contain data about their occupation, allowing for better segmentation and analysis.
Finally, make sure to register the visitor_occupation as a user-scoped custom dimension in GA4.
Step 3: purchase event
GHL websites store order data (like product name and price) in the browser's local storage - but under a random key, making it impossible to reliably fetch.
To overcome this, we’ll use website scraping to capture the order data when the user clicks the Complete Order button. We’ll then save this data to session storage and retrieve it on the confirmation page.
Identify the order button
First of all, create a new Custom JavaScript variable with the following code to get the clicked element’s CSS path that can be used to narrow down the trigger using RegEx (all credits go to Simo Ahava):
function() {
// Build a CSS path for the clicked element
var originalEl = {{Click Element}};
var el = originalEl;
if (el instanceof Node) {
// Build the list of elements along the path
var elList = [];
do {
if (el instanceof Element) {
var classString = el.classList ? [].slice.call(el.classList).join('.') : '';
var elementName = (el.tagName ? el.tagName.toLowerCase() : '') +
(classString ? '.' + classString : '') +
if (elementName) elList.unshift(elementName);
}
el = el.parentNode
} while (el != null);
// Get the stringified element object name
var objString = originalEl.toString().match(/\[object (\w+)\]/);
var elementType = objString ? objString[1] : originalEl.toString();
var cssString = elList.join(' > ');
// Return the CSS path as a string, prefixed with the element object name
return cssString ? elementType + ': ' + cssString : elementType;
}
}
Name the variable CJS - CSS element path and save.
Create the triggers
You’ll need two Click – All Elements triggers:
Button text trigger
This trigger fires on:
CJS - CSS element path matches RegEx (ignore case) form-payment.*button.form-btn(.*main-text)?
Click Text matches RegEx (ignore case) complete order
Make sure to replace the Click Text value with your actual button text.
Button icon trigger
This trigger fires on:
CJS - CSS element path matches RegEx (ignore case) form-payment.*button.form-btn.*cart-icon
Make sure to review your actual button icon contains the cart-icon class.
This trigger ensures the tag fires even if the user clicks directly on the icon within the button.
Capture order data
Create a Custom HTML tag with the following code:
<script>
// Function to save data to session storage
function saveToSessionStorage(key, value) {
var storedData = sessionStorage.getItem('orderData');
var data = storedData ? JSON.parse(storedData) : {};
data[key] = value;
sessionStorage.setItem('orderData', JSON.stringify(data));
}
function saveOrderDataToSessionStorage() {
// order_total
var priceElement = document.querySelector('.order-total .item-price');
if (priceElement) {
var priceValue = priceElement.textContent.trim().replace('€', '');
var priceInteger = parseInt(priceValue, 10);
if (!isNaN(priceInteger)) {
saveToSessionStorage('order_total', priceInteger);
} else {
console.log('Order total price value is not a valid number.');
}
} else {
console.log('Order total price element not found.');
}
// item_name
var descriptionElement = document.querySelector('.product-description .coupon-item') || document.querySelector('.--mobile-product-description .coupon-item');
if (descriptionElement) {
var itemDescription = descriptionElement.textContent.trim();
saveToSessionStorage('item_name', itemDescription);
} else {
console.log('Item description element not found.');
}
}
saveOrderDataToSessionStorage();
</script>
If your currency is not EUR, replace € with your symbol.
Attach the two Click - All Elements triggers you just created to this tag.
Every time the Complete Order button is clicked, the order data will now be stored in session storage.
You can verify this in Developer Tools > Application > Session Storage.
Retrieve the order data
Create 2 Custom JavaScript variables.
Order total variable
function() {
var orderData = sessionStorage.getItem(‘orderData’);
var data = orderData ? JSON.parse(orderData) : {};
return data.order_total || null;
}
Item name variable
function() {
var orderData = sessionStorage.getItem(‘orderData’);
var data = orderData ? JSON.parse(orderData) : {};
return data.item_name || null;
}
For the item name variable, enable Transform to lowercase.
Save both variables.
Push order data to the data layer
Create a Custom HTML tag with the following code:
<script>
(function() {
function generateTransactionID() {
var chars = 'ABCDEFGHIJKLMNOPQRSTUVWXYZ0123456789';
var result = '';
for (var i = 0; i < 10; i++) {
result += chars.charAt(Math.floor(Math.random() * chars.length));
}
return result;
}
var randomString = generateTransactionID();
dataLayer.push({ ecommerce: null }); // Clear the previous ecommerce object.
dataLayer.push({
event: "purchase",
ecommerce: {
transaction_id: randomString,
value: {{CJS - order data - order_total - SS get}},
tax: 0,
shipping: 0,
currency: "EUR",
items: [{
item_id: "{{CJS - order data - item_name - SS get}}",
item_name: "{{CJS - order data - item_name - SS get}}",
index: 0,
price: {{CJS - order data - order_total - SS get}},
quantity: 1
}]
}
});
})();
</script>
Inside the code, modify the variable names and currency as needed.
Fire this tag on your order confirmation page, using an Initialisation trigger:
GA4 purchase event tag
In GTM:
Create a new GA4 Event tag.
Measurement ID: your constant variable.
Event name: purchase
Under More Settings > Ecommerce, enable Send Ecommerce data
Leave Data Layer as the Data source.
The custom HTML tag we created earlier contains all parameters in the format required by GA4, so we can make use of this useful feature instead of having to map all parameters manually.
For trigger, create a Custom Event trigger with the purchase event name:
And we’re done!
Save and make a test purchase to verify.
The easiest way to make a test purchase in GHL is to enable the Test payment mode from within the website/funnel global settings:
And use one of Stripe's test cards to make the payment.
Step 4: prevent over-reporting
When using confirmation pages, a common issue is over-reporting - if the visitor reloads the page, or leaves it open to get back to it later (especially if it contains important information), the purchase event will fire again.
To prevent this, we’ll add a simple, yet effective mechanism:
Create a Custom JavaScript variable and name it CJS - clean Page Path:
function() {
var origPath = {{Page Path}};
var newPath = "";
newPath = origPath.replace(/\//g, "");
return newPath;
}
Create a Custom HTML tag that counts the number of page loads of the current page:
<script>
// get the page path
var key = 'pv_count_for_' + {{CJS - clean Page Path}};
// check if localStorage item for the current page exists
if (localStorage.getItem(key)) {
counter = localStorage.getItem(key);
counter = parseInt(counter, 10);
counter++;
localStorage.setItem(key, JSON.stringify(counter));
}
// if it doesn't, create it and set it to 1
else if (!localStorage.getItem(key)) {
counter = 1;
localStorage.setItem(key, JSON.stringify(counter));
}
</script>
For the trigger, use the Initialisation trigger of the purchase confirmation page:
Create a new Custom JavaScript variable to retrieve the count from the local storage:
function() {
key = 'pv_count_for_' + {{CJS - clean Page Path}};
return parseInt(window.localStorage.getItem(key));
}
Go to your purchase trigger and modify it by adding this condition:
CJS - PV count - LS get less than or equal to 1
This ensures the event fires only once, even if the visitor reloads the page.
(Note: This won’t prevent over-reporting across devices.)
Step 5: consent-based tracking
So far, our setup doesn’t respect user consent preferences.
Let’s fix that.
Configure Cookifi (or other CMP)
Make sure your CMP property is configured with:
Google Consent Mode default & update commands enabled for the relevant region(s):
cookie banner visible on your website:
Enable consent overview in GTM
In GTM:
Go to Admin > Container Settings > check Enable consent overview
Click Save.
You’ll now see a shield icon next to Tags:
Configure consent requirements
Click the Consent Overview icon. You’ll see all tags grouped into:
Consent Not Configured (currently all tags)
Consent Configured
Thanks to this, you can
see at a glance the consent requirements status for all your tags
edit the consent requirements for multiple tags at once
Select all GA4 tags and click the shield icon:
In the following pop up, click Require additional consent for tag to fire > Add required consent. Add analytics_storage and click Save:
The three tags now move to the Consent Configured category.
Repeat the same process for the Custom HTML tags we created, but select No additional consent required, as these don’t send data to any external platforms.
Modify triggers
As a last step, we need to modify the triggers of our GA4 tags.
For the Google Tag (configuration tag):
Replace its Initialisation - All pages trigger with a new Custom Event trigger (Event name: cookifi-consent-update). This custom event fires on every page load, so it can be safely used for tags that need to fire on all pages.
Using this trigger ensures the tag fires only after the visitor has made their consent choice. At the same time, Cookifi (or any other reliable CMP) will emit the Google Consent Mode Update command, which - together with the Additional consent checks in GTM - ensures that the tag fires only if the relevant consent is granted (in this case, consent for analytics_storage).
For the purchase and form_submit GA4 tags, you don’t need to change anything. By the time these events are triggered, Cookifi will have already sent the Update command, so the tags will be either fired or blocked based on the user’s consent.
If you’re using a different CMP, make sure to verify that it emits the Update command in time. Some CMPs may trigger the command too late, causing tags to fire before consent is properly registered. In that case, you’ll need to configure Trigger Groups in GTM - combining your tag’s trigger with an additional trigger listening for the consent update event - to ensure compliance.
If you’re looking for a reliable, freelancer-focused CMP that’s easy to integrate with GTM, check out Cookifi - we’re currently offering special deals for early adopters.
If you’d rather have me take care of this for you, feel free to reach out here — happy to help.
If you're looking for data layers for Google Ads (with customisable product IDs, and dynamic remarketing), Meta Ads, and others - please reach out here, I've built solutions for those too.